The Magic of a Pampas Grass Wedding Ceremony Backdrop
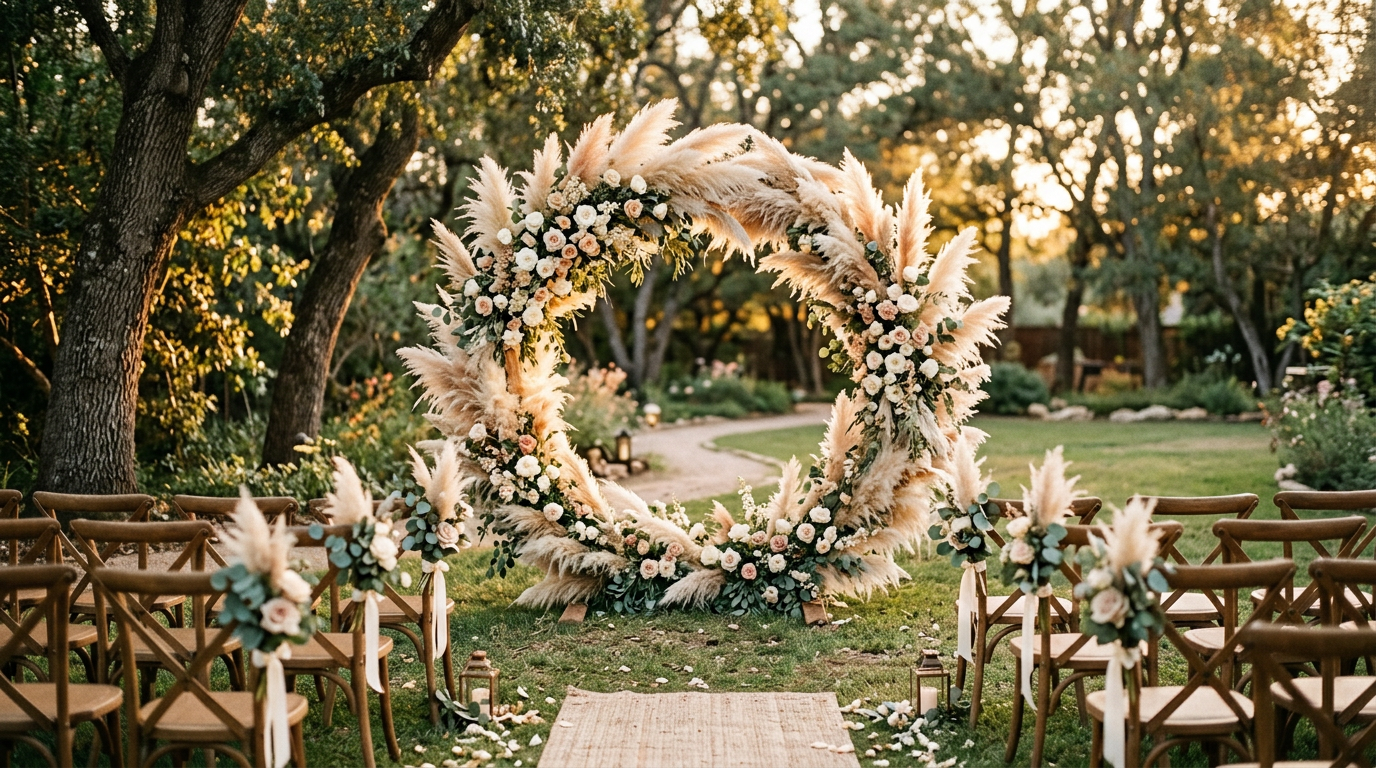
There is nothing quite like the moment you step onto the aisle, lock eyes with your partner, and exchange vows in front of a breathtaking pampas grass wedding ceremony backdrop. As you plan your dream wedding, creating a picture-perfect focal point for your ceremony is likely at the top of your priority list. The ceremony backdrop is not just a decorative element; it is the frame for the most important promises of your life and the setting for the photographs you will cherish forever. Pampas grass has taken the wedding world by storm, and for good reason. Its soft, feathery texture, warm neutral color palette, and effortless volume bring an instant sense of romance, movement, and organic luxury to any venue.
Whether you are hosting a romantic vintage gathering in an intimate indoor loft, a sun-drenched boho outdoor celebration, or a cozy autumn micro-wedding, incorporating a pampas grass wedding ceremony backdrop allows you to bring natural, organic textures indoors or beautifully frame an outdoor view. The versatility of these cloud-like plumes means they adapt seamlessly to different color schemes, from earthy terracotta and sage green to sophisticated monochromatic creams and even moody burgundies. If you are planning a late-year celebration, pairing this earthy look with cozy elements is a must. Check out our guide on Cozy Winter Wedding Reception Decor: How to Style a Warm, Magical Celebration to seamlessly transition your ceremony vibes into your reception space.
We understand that planning a wedding can feel overwhelming, especially when trying to balance your dream aesthetic with a realistic budget. That is why we are here to simplify the process. A stunning, high-impact floral installation does not have to come with a multi-thousand-dollar price tag. By understanding how to source, prep, and style your own pampas grass, you can achieve a high-end, editorial look for a fraction of the cost. Let us dive into the ultimate guide to designing, building, and styling a gorgeous pampas grass installation that will wow your guests and keep your wedding-planning journey completely stress-free.
Styling Your Pampas Grass Backdrop: 4 Trending Aesthetics
One of the greatest benefits of using dried grasses and botanicals is their incredible adaptability. Depending on how you style, frame, and accent your installation, you can completely transform the vibe of your ceremony space. Whether you are dreaming of a cozy autumn micro-wedding or a grand winter celebration, a stunning pampas grass wedding ceremony backdrop can be customized to match your exact aesthetic. Let us explore four of the most popular design styles that modern couples are loving right now.
1. The Boho Outdoor Dream
For the free-spirited couple, a boho pampas grass wedding arch is the ultimate choice. This style thrives on organic, asymmetrical shapes and rich, earthy textures. To achieve this look, build your installation on a rustic wooden triangular or hexagonal frame. Blend oversized, fluffy pampas plumes with dried palm spears, bleached peacock feathers, and trailing eucalyptus. To add a pop of color, incorporate warm terracotta roses, dried orange slices, or dahlias in shades of mustard and rust. This design looks particularly magical against natural backdrops like desert landscapes, mountain ranges, or golden forest clearings, creating an effortless connection with nature.
2. Modern Minimalist Elegance
If your style leans toward clean lines, open spaces, and understated luxury, a modern pampas grass wedding backdrop is the perfect fit. Instead of a fully covered arch, opt for a sleek, circular or double-bar metal frame in matte black or brushed brass. Focus your pampas grass arrangements in two or three strategic, asymmetrical clusters, leaving parts of the elegant metal frame exposed. Keep the color palette strictly monochromatic with shades of cream, sand, and ivory. By pairing the soft, organic texture of the grass with the sharp, industrial lines of the metal, you create a striking, contemporary contrast that looks incredibly sophisticated and high-end.
3. Romantic Vintage Glamour
For a look that feels incredibly soft, whimsical, and timeless, combine the airy texture of pampas grass with the lush, classic beauty of fresh roses. A romantic vintage backdrop often features a classic rounded arch completely covered in a mix of fluffy neutral pampas, soft blush garden roses, white hydrangeas, and delicate baby's breath. The key to this look is abundance and softness—you want the installation to look like a blooming, cloud-like garden. Frame the base of the arch with antique brass candlesticks and flickering pillar candles to cast a warm, nostalgic glow over your vow exchange.
4. Black-Tie Glam & Winter Warmth
Who says pampas grass is only for casual outdoor weddings? When styled correctly, dried grasses can look exceptionally glamorous and formal. For a black-tie affair, create a massive, semi-circular ground installation that curves around you and your partner, making it look as though you are standing in a meadow of golden clouds. Mix the pampas with metallic-painted foliage, gold-dipped ruscus, and deep, moody burgundy orchids. This style works beautifully in grand indoor spaces, ballrooms, or historic estates, adding drama, height, and unmatched texture to your ceremony photos.
4 Crucial Mistakes to Avoid When Designing Your Pampas Grass Backdrop
When planning your pampas grass wedding ceremony backdrop, it is easy to get swept away by gorgeous Pinterest images without realizing the logistics involved. Dried florals behave differently than fresh flowers, and a few simple oversights can lead to wedding-day headaches. To ensure your installation goes off without a hitch, keep these four common mistakes in mind.
Mistake 1: Forgetting to prep and seal the plumes. Natural pampas grass is notorious for shedding. If you do not prep your plumes ahead of time, a sudden gust of wind during your vows could leave you, your partner, and your guests covered in fluffy white seeds. To prevent this, gently shake out your plumes outdoors to remove loose fibers, let them sun-bathe for a few hours to fluff up, and then generously mist them with a strong-hold hairspray. This seals the fibers in place and keeps your backdrop looking pristine all day long.
Mistake 2: Ignoring wind and weather conditions. Because pampas grass is incredibly lightweight and acts like a sail, a strong breeze can easily tip over an outdoor arch. Never rely on the weight of the grass to keep your frame stable. Always secure your backdrop frame with heavy sandbags, metal stakes, or weights hidden at the base. If you are building a DIY pampas grass wedding decor installation, test the stability of your frame in outdoor conditions well before the wedding day.
Mistake 3: Sourcing thin, low-quality grass. Not all pampas grass is created equal. Cheap, low-quality grass often arrives looking thin, flat, and dull, and no amount of fluffing will give you that luxurious, cloud-like look. Look for premium, extra-fluffy varieties (often labeled as Type N or premium dried pampas). If you are on a tight budget, consider mixing a few high-quality faux pampas stems into the center of your arrangements to add instant volume and structure without driving up the cost.
Mistake 4: Overspending without looking for budget-friendly alternatives. Many couples assume that to get a lush look, they have to pay thousands of dollars to a professional florist. However, because dried florals do not wilt, they are the absolute best candidate for DIY wedding decor. By sourcing your materials early, utilizing smart shopping seasons, and building the arrangements yourself, you can save a significant portion of your floral budget. To keep your wedding finances on track during the busy holiday sales season, don't miss our Black Friday Shopping Budget Checklist: Save Money & Build Wealth.
Step-by-Step Guide: How to Build Your DIY Pampas Grass Wedding Ceremony Backdrop
Building a DIY pampas grass wedding ceremony backdrop is entirely possible and can save you hundreds of dollars. Because dried florals do not require water, you can actually assemble the majority of your backdrop weeks in advance, completely eliminating wedding-day setup stress. Follow this detailed timeline and action plan to create your own professional-grade installation.
The Budget Breakdown
- DIY Approach: $250 – $600 total (includes metal frame, 40-60 premium pampas plumes, floral foam, zip ties, and accent dried florals).
- Professional Florist: $1,200 – $3,500+ (includes design, fresh floral additions, labor, delivery, and setup fees).
The Preparation Timeline
- 3 Months Before: Select your backdrop frame (circle, arch, or triangle) and order your premium dried pampas grass. Store the grass in a dry, cool place away from direct sunlight.
- 1 Month Before: Unbox your pampas grass. Gently shake each stem outdoors, then place them in vases in a sunny room for 24-48 hours. The warmth of the sun will cause the plumes to naturally open up and double in volume. Once fluffy, spray them thoroughly with high-hold hairspray.
- 2 Weeks Before: Build your floral foam cages. Using dry floral foam blocks wrapped in chicken wire, create the base structures that will hold your stems. You can pre-insert some of your sturdier dried foliage (like palm spears or eucalyptus) to save time on the big day.
- Wedding Day (or Day Before): Assemble the frame at the venue, secure the weighted bases, zip-tie your pre-made floral foam cages to the frame, and insert your fluffy pampas grass plumes to fill out the design. Give the entire installation one final mist of hairspray.
Step-by-Step Assembly Instructions
- Step 1: Set Up and Secure the Frame. Assemble your arch or hoop in its exact ceremony location. Weigh down the base using heavy sandbags or bricks, and drape fabric, wooden crates, or additional greenery over the base to hide the weights.
- Step 2: Attach the Floral Foam Cages. Securely attach your dry floral foam cages (wrapped in chicken wire) to the frame using heavy-duty plastic zip ties. Pull them as tight as possible so there is absolutely no wobbling.
- Step 3: Define the Shape with Base Foliage. Start by inserting your larger, structured elements like dried palm leaves, fan palms, or sturdy branches. This establishes the overall boundaries, height, and asymmetrical shape of your installation.
- Step 4: Layer in the Pampas Grass. Insert your premium pampas grass stems into the foam, angling them outward to create a sense of movement. Start with the largest, fluffiest plumes in the center to create a lush core, and use smaller, sleeker stems near the edges to soften the borders.
- Step 5: Add Accent Florals and Seal. Fill in any remaining gaps with delicate dried flowers, fresh roses, or eucalyptus. Once you are thrilled with the shape and fullness, spray the entire installation generously with hairspray to lock everything in place.
Essential Tools, Materials, and Money-Saving Hacks
To help you bring your dream pampas grass wedding ceremony backdrop to life, we have compiled a list of essential tools and money-saving hacks. Having the right supplies on hand will make the assembly process smooth, fun, and completely stress-free.
The Ultimate DIY Toolkit
- Premium Pampas Plumes: 40 to 60 stems for a medium-to-large semi-covered arch.
- Dry Floral Foam Blocks: Specifically designed for dried arrangements (do not use wet foam, as it can cause dried stems to rot).
- Chicken Wire and Wire Cutters: To wrap the foam blocks and provide extra structural support for thick stems.
- Heavy-Duty Zip Ties: 8-inch to 12-inch plastic zip ties in green, black, or clear to secure the foam to your frame.
- Strong-Hold Hairspray: Standard, inexpensive unscented hairspray (like Aqua Net) works best for sealing the plumes.
- Weighted Sandbags: Essential for keeping outdoor frames stable and safe.
Smart Money-Saving Hacks
If you want to achieve a lavish look while keeping your budget intact, there are several clever strategies you can use. First, consider repurposing your backdrop. Your ceremony only lasts about 30 minutes, so make sure you get your money's worth! Design your pampas grass installation so that it can be easily moved after the ceremony to serve as the backdrop for your sweetheart table, reception head table, or a gorgeous DIY photo booth. This instantly cuts your decor costs in half by making one installation do double duty.
Second, look into renting your backdrop frame instead of buying one, or check local wedding resale groups on social media. Many brides sell their metal arches, leftover pampas grass, and styling tools immediately after their weddings for a fraction of the retail price. Sourcing gently used items is a fantastic way to find affordable pampas grass wedding ideas while being eco-friendly.
While you are busy crafting the perfect ceremony space, don't forget to show appreciation to those helping you put it all together. Take a look at our curated guide to the Best Bridesmaid Thank You Gifts: 21 Elegant Ideas to Wow Your Bridal Party to find the perfect tokens of gratitude for your creative crew. If you want to involve your family in the planning process, you might also explore our guide on Personalized Mother of the Bride Gifts: 15 Heartfelt Ideas to thank your mom for her endless support during this exciting season.
Your Picture-Perfect Vows Await
Your wedding day is a beautiful reflection of your unique love story, and every detail should make you feel excited, inspired, and deeply connected. A pampas grass wedding ceremony backdrop offers the perfect blend of organic beauty, modern romance, and artistic texture. By choosing the styling aesthetic that speaks to your soul, avoiding common prep mistakes, and utilizing our step-by-step DIY guide, you can create a breathtaking, editorial-worthy vow exchange space that looks incredibly expensive but fits comfortably within your budget.
Investing your time and creativity into a pampas grass wedding ceremony backdrop will elevate your wedding design and leave your guests in absolute awe. Take a deep breath, gather your favorite inspiration photos, and enjoy the beautiful process of bringing your dream wedding to life. For more expert wedding styling advice, budget-saving checklists, and beautiful inspiration for your big day, explore our latest guides and start planning your picture-perfect celebration today!