Bring the Magic of the Season Indoors with a DIY Hanging Branch Light Fixture
As the nights draw in and the crisp winter air settles, there is nothing quite like the warm, inviting glow of cozy home lighting to make your space feel like a sanctuary. During the darker months, lighting becomes the most crucial design element in our homes. If you want to transform your space into a magical winter wonderland without spending a fortune, we have the perfect weekend project for you. Anyone can do this, and the results look incredibly expensive for less.
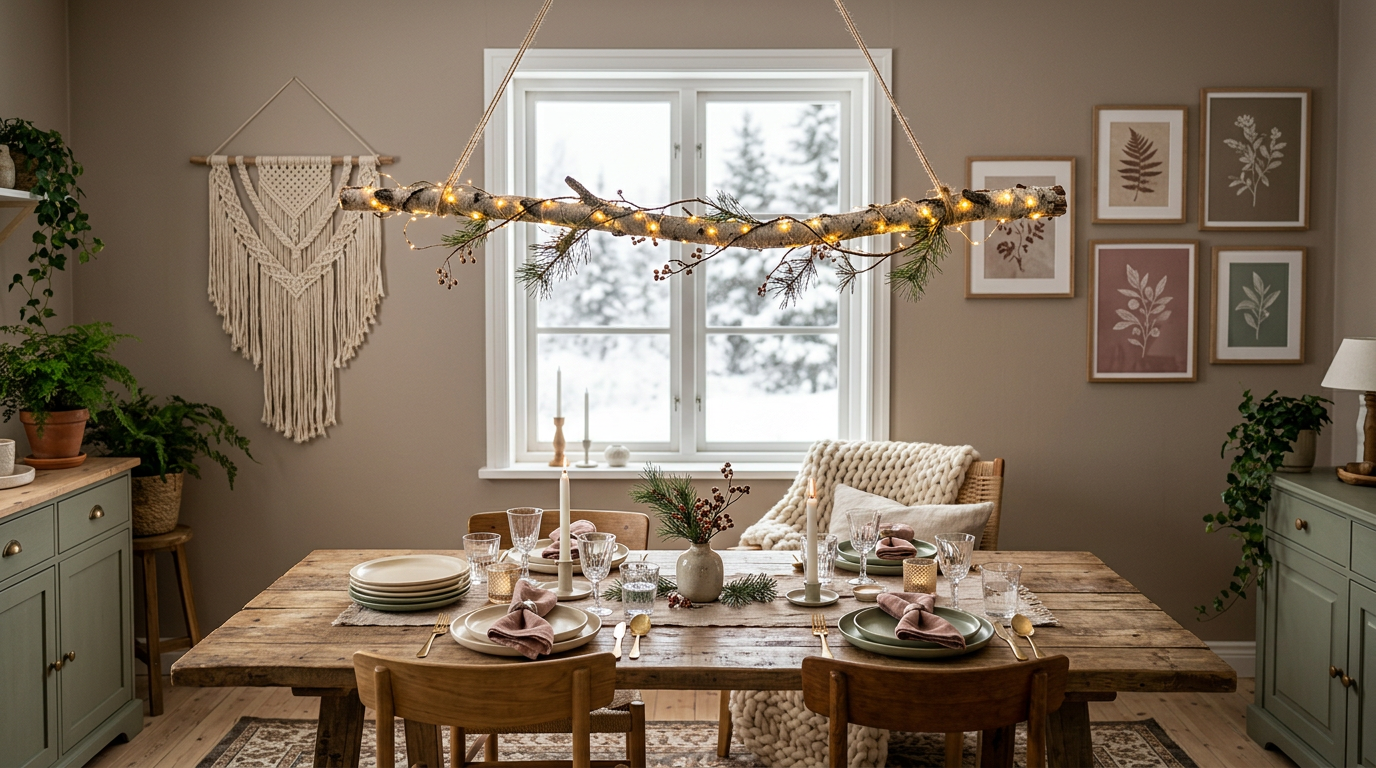
Today, we are sharing the ultimate guide to creating a stunning diy hanging branch light fixture winter centerpiece. Whether you are a homeowner looking to add a permanent rustic touch to your dining room, or a renter seeking a damage-free seasonal update, this budget-friendly project will instantly elevate your home decor. By sourcing natural elements from your own backyard and combining them with budget-friendly lighting, you can create a high-end, organic look that rivals expensive boutique fixtures costing hundreds of dollars.
This tutorial is designed to be highly customizable, fitting seamlessly into various trending design aesthetics including modern farmhouse, boho, Scandinavian, cottagecore, and art deco revival. Grab a cup of hot cocoa, and let’s dive into how you can bring this beautiful, glowing installation to life this weekend.
Why the DIY Hanging Branch Light Fixture is the Ultimate Winter Decor Statement
Creating a diy hanging branch light fixture winter display allows you to bring the beauty of nature indoors, which is a core tenet of Scandinavian and cottagecore design. During winter, our connection to the outdoors often shrinks. By introducing natural wood textures and pairing them with warm, ambient lighting, you create a visual bridge to the natural world that promotes feelings of comfort and well-being.
From a budget perspective, retail stores often charge upwards of $200 to $500 for rustic branch chandeliers. By making your own, you can easily keep your total cost under $30—especially if you forage the branch yourself. The main expenses are simply the lights and the hanging hardware, making this an incredibly cost-effective way to make a massive visual impact in your home.
Furthermore, this project is highly adaptable. You can hang it over a dining table as a dramatic centerpiece, suspend it above a bed for a cozy cabin feel, or mount it in a living room corner to illuminate a reading nook. Because it uses lightweight materials and versatile power options (like battery packs or plug-in cords), it is exceptionally renter-friendly. You do not need to worry about complex electrical wiring or hiring an electrician; this project is entirely DIY-friendly and safe for beginners.
Choosing the Perfect Branch and Design Style
Before you head outside to search for the perfect branch, it is helpful to decide on the specific design aesthetic you want to achieve. Different types of wood and styling choices can completely alter the final look of your diy hanging branch light fixture winter installation.
The Scandinavian Minimalist Look
If you love clean lines, bright spaces, and simple elegance, aim for a Scandinavian aesthetic. Look for a straight, smooth birch or light oak branch with minimal offshoots. Keep the bark intact if it is a beautiful silver birch, or sand it down to a pale, clean finish. Wrap the branch tightly with warm-white micro copper wire LED lights, and keep additional foliage to a bare minimum—perhaps just a single sprig of dried eucalyptus or pine.
The Cottagecore Woodland Vibe
For a more whimsical, storybook feel, look for a highly textured, gnarly branch with interesting twists, turns, and small offshoots. Fallen oak, applewood, or grapevine branches work beautifully for this style. You can intertwine delicate forest elements like pinecones, faux berries, and preserved moss. This style pairs beautifully with organic textures throughout the rest of your room. For example, you can learn how to complement these natural elements in our guide on Rattan Furniture Styling: How to Create a High-End Look on a Budget.
The Modern Farmhouse Twist
If your style leans more toward modern farmhouse, look for a sturdy, medium-weight branch with a weathered, drift-wood appearance. You can paint the branch with a light coat of white or gray chalk paint, then lightly sand the edges to create a distressed, rustic finish. Instead of micro fairy lights, you can wrap thick jute rope plug-in pendant lights with vintage-style Edison bulbs around the branch for a bolder, more industrial statement.
Sourcing and Preparing Your Wood
The best place to find your branch is right in your backyard or a local public park after a windy day. Look for fallen branches that are completely dry and structurally sound. Avoid wood that is soft, rotting, or shows signs of heavy insect damage. Ideally, the branch should be between 3 to 5 feet long and 2 to 3 inches in diameter, depending on where you plan to hang it.
Crucial Safety and Hanging Tips for Renters and Homeowners
Safety is paramount when suspending any object from your ceiling. Fortunately, because branches are relatively lightweight, securing your diy hanging branch light fixture winter is straightforward if you follow a few basic rules.
Weight Distribution: Always weigh your completed branch (with lights and decor attached) before hanging it. Most DIY branch fixtures weigh between 3 and 8 pounds. If your fixture is under 5 pounds, you can easily hang it using standard ceiling cup hooks screwed directly into a ceiling joist. If you cannot locate a joist, use toggle bolts or heavy-duty drywall anchors rated for at least double the weight of your fixture.
Renter-Friendly Solutions: If you are renting and cannot drill holes into your ceiling, do not worry! You can suspend a very lightweight branch from an existing curtain rod using strong monofilament (fishing line) or decorative ribbon. Alternatively, you can use high-quality, damage-free adhesive ceiling hooks rated for up to 7.5 pounds. Just ensure you clean the ceiling surface thoroughly with rubbing alcohol before applying the adhesive to ensure a secure bond.
Electrical Safety: Since this is a DIY project, we highly recommend using low-voltage LED lights. LED lights do not emit heat, making them completely safe to wrap around dry wood and artificial foliage. If you are using battery-operated lights, select a set with a built-in timer (e.g., 6 hours on, 18 hours off) so you do not have to climb up to turn them on and off every day. You can easily hide the battery pack on top of the branch using green floral wire or a zip tie.
Step-by-Step Guide: Crafting Your Winter Branch Light Fixture
Let’s dive into the step-by-step tutorial to assemble your diy hanging branch light fixture winter creation. This project takes about 2 hours to complete (excluding wood drying time) and is a wonderful afternoon activity.
Step 1: Prep and Clean the Branch
Once you have foraged your perfect branch, it is vital to clean and prep it to ensure no dirt, mold, or bugs enter your home. Brush off any loose dirt, moss, or peeling bark with a stiff-bristled brush. To ensure the wood is completely pest-free, wipe it down thoroughly with a diluted bleach solution (1 part bleach to 10 parts water) or a mixture of white vinegar and water. Let the branch dry completely in a warm, dry area for at least 24 to 48 hours before proceeding.
Step 2: Sand and Finish (Optional)
If you prefer a more polished look, use medium-grit sandpaper to smooth out any rough patches or sharp points where twigs were broken off. If you want to change the color of the wood, now is the time to apply a thin coat of chalk paint or a wood stain. For a beautiful, frosted winter look, you can lightly dry-brush white chalk paint onto the branch to mimic a light dusting of snow. Let any paint or sealant dry completely.
Step 3: Wrap the Lights
Take your warm-white LED copper wire fairy lights and begin wrapping them around the branch. Start from the center where you plan to hide the battery pack (or where the plug-in cord will run down). Wrap the wire tightly around the main body of the branch, working your way out to the tips of the offshoots, and then back toward the center. Secure the ends of the light wire with a small dab of hot glue or a twist of green floral wire. Ensure the lights are distributed evenly so the entire branch glows beautifully.
Step 4: Add Winter Greenery and Festive Accents
Now comes the fun part—styling your branch for the winter season! Using green floral wire, secure small sprigs of faux cedar, pine, or eucalyptus along the top of the branch. For a festive touch, you can hang lightweight shatterproof ornaments, pinecones, or dried orange slices from the branch using clear fishing line. If you love handmade seasonal touches, consider incorporating elements from our guide on Handmade Holiday Garland Ideas: 4 Easy, Budget-Friendly DIYs to add extra charm and texture to your hanging fixture.
Step 5: Hang and Secure the Fixture
Tie your hanging medium (jute twine, black metal chain, or clear fishing line) securely to two balanced points on the branch. Lift the branch to test the balance; adjust the knots as needed so the branch hangs level. Screw your ceiling hooks into the ceiling at the corresponding distance. Carefully lift the branch and loop the twine or chain onto the hooks. Step back, adjust the leveling, turn on your lights, and enjoy the gorgeous, cozy glow!
Essential Tools and Recommended Materials
To make this project as easy as possible, we recommend gathering all your tools and materials before you begin. Here is a quick list of highly recommended items you can easily find on Amazon to ensure a professional, polished finish:
- Hot Glue Gun: A dual-temp hot glue gun is essential for securing loose wire ends, faux greenery, and delicate ornaments directly to the wood without messy residue.
- Chalk Paint: A small pot of white or antique-gray chalk paint is perfect for achieving that distressed, modern farmhouse or frosted winter finish.
- LED Copper Wire Fairy Lights: Opt for a 50ft or 100ft strand of warm-white (2700K) micro LEDs with a remote control and timer function for ultimate convenience.
- Floral Wire & Wire Cutters: 24-gauge green floral wire is incredibly helpful for invisibly securing pine sprigs and hiding battery packs.
- Ceiling Hooks: Heavy-duty screw-in cup hooks (or adhesive ceiling hooks for renters) to safely suspend your masterpiece.
By using quality, budget-friendly materials, you ensure your fixture looks high-end and lasts throughout the entire winter season and beyond. If you want to continue upgrading your home on a budget this season, check out our Black Friday Shopping Budget Checklist: Save Money & Build Wealth to plan your home decor purchases wisely.
Enjoy Your Cozy Winter Wonderland
Crafting a custom diy hanging branch light fixture winter display is more than just a simple weekend craft; it is an incredibly rewarding way to personalize your home and inject warmth into the coldest months of the year. The organic beauty of the wood combined with the soft, twinkling lights creates an instant focal point that will have guests asking where you bought it. Best of all, because it is made from natural and affordable materials, you can feel proud of creating a stunning piece of decor that fits your budget perfectly.
Once winter fades, you can easily transition this fixture into spring and summer by swapping out the pine needles and pinecones for delicate faux cherry blossoms, hanging glass terrariums, or fresh eucalyptus. It is a versatile, year-round decor piece that costs pennies but looks like a million bucks. Gather your materials, find your perfect branch, and start crafting your cozy winter sanctuary today! Don’t forget to share your finished creations with us on social media.